Chapter 9. A Short Introduction to the GIMP
The GNU Image Manipulation Program (GIMP) can help you create, alter, manipulate and enhance digital image files -- photographs, scanned images, computer-generated images, and more. This chapter is intended to give you a quick overview of the GIMP and its more common applications.
Like other fields, image manipulation has its own vocabulary. This chapter can't possibly provide complete documentation for all of the the terms and concepts needed for complete understanding of the GIMP. If you want to learn more, a variety of books are available which document the GIMP and its capabilities, as well as the background concepts of image manipulation. Please refer to the section called Where to Find More Information if you need more information about the GIMP.
As you'll quickly find out if you try the GIMP, it includes a wealth of tools for editing images -- much more than could be described in a single chapter.
Furthermore, if you can't create the right effect with the tools that the GIMP provides, and you're not afraid to write scripts in the Scheme scripting language, you can add a new Script-Fu to the GIMP. A Script-Fu is somewhat analogous to a macro in a word processing or spreadsheet application -- it applies a set series of effects (filters or other GIMP capabilities) to a graphic or piece of text. Anyone can use the pre-written Script-Fus included with the Gimp, but you can also write your own. See the section called Where to Find More Information for more sources of information about Script-Fus.
The GIMP can do a lot of things, but it has some limitations. Graphic artists who create images for print media may find the GIMP lacking, or just more difficult to use, for pre-press applications.
For example, the GIMP can't (yet) work in the CMYK (cyan, magenta, yellow and black) colorspace, which is generally used for printing color graphics. The GIMP instead uses the RGB (red, green and blue) colorspace, which should be familiar to people who have created graphics for the Web.
Since the GIMP is well-suited for creating graphics for the Web, that's what we're going to do in this chapter. First, we'll edit a photo for display on a webpage. Then we'll create a background image, which will be tiled on the background of our webpage. Finally, we'll use the GIMP to create a title image for the webpage.
Before we start "learning by doing," you'll need to know some basics: creating files, saving files, the Toolbox and Dialogs.
GIMP Basics
To use the GIMP, you'll need to know some of the basics. From an Xterm, you start the GIMP using the command (you guessed it): gimp.
Like many applications, the GIMP provides more than one method to accomplish tasks. Generally, there are three ways to work in the GIMP:
By right-clicking on an image, which will display a set of menus containing most of the GIMP's many capabilities
From the Toolbox, using the tools or the File or Xtns pull-down menus -- see the section called The Toolbox
With keyboard shortcuts -- see the section called Helpful Keyboard Shortcuts
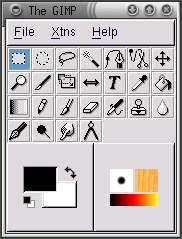
When you start the GIMP, you'll see the Toolbox.
The Toolbox
The GIMP Toolbox is a palette of commonly used GIMP tools:
You can minimize the Toolbox (send it to the panel), but if you close the Toolbox, you're closing the GIMP.
If you move your mouse over the individual buttons in the Toolbox, a pop-up dialog will appear to identify the tool's purpose.
Click on the button for the tool you want to use in the Toolbox. The button will then be colored in, to indicate that it is the active tool.
Generally, you use a tool on an image by activating the tool, then clicking and dragging on your image. If a portion of the image is selected, then the tool will only work on the selected portion. Selections are identified by a moving dotted-line border (called "marching ants").
Many of the tools have options. Double-clicking on the tool's button will display the Tool Options dialog for that tool.
Tools in the Toolbox
 Select rectangular regions
Used to select rectangular portions of an image. If you click on the image, then press and hold Shift while you're dragging, the rectangle will be a square. If you click on the image, then press and hold Ctrl while you're dragging, your starting area will be the center of the rectangle (normally the starting point is at an edge of the rectangle).
 Select elliptical regions
Used to select circular or oval portions of an image. If you click on the image, then press and hold Shift while you're dragging, the ellipse will be a circle. If you click on the image, then press and hold Ctrl while you're dragging, your starting point will be the center of the ellipse (normally, your starting point is at an edge of the ellipse).
 Select hand-drawn regions
This tool, also known as the lasso, is used to draw a freehand selection. Click and drag to draw a selection. When you get back to where you started, release the mouse button.
 Select contiguous regions
This tool, also known as the fuzzy selection tool or magic wand, is used to select portions of an image based on color values. When you click once on an image with the magic wand active, pixels with color values close to that pixel will be selected. If you click and drag the magic wand, a larger group of pixels will be used as the starting point. All regions of the image with a color value similar to the selected group of pixels will be selected.
 Select regions using Bezier curves
This selection tool is similar to the freehand select tool, but it allows you to customize your selection. If you need to be very precise when you're selecting a complicated object, the Bezier tool will probably be the right choice for the job.
To create a Bezier selection, click to create control points in a connect-the-dots pattern around your selection. Put a control point at every corner or angle of your selection.
When you get around to where you started, click on the first control point you created to close the selection. Now you can move the control points and create curves between them to modify your selection.
To move control points, hold down the Ctrl key and drag the point you want to move.
To create curves, you need to click and drag on a control point. As you drag away from the control point, you'll see handles appear. Click and drag on the handles to control the shape of the curve.
If you only want to affect the curve on one side of a control point, hold down the Shift key and drag on one of the handles.
Once you've finished modifying the Bezier selection, click inside the selection to activate it.
 Select shapes from image
The Select shapes from image tool (or intelligent scissors) is still in development. Once it is perfected, it is intended to improve upon your selection and automatically select the correct shape. This tool occasionally behaves unpredictably, but give it a try. Obviously, this type of selection is easier for the GIMP to handle if the area selected has a distinct edge.
Click on the intelligent scissors tool in the toolbox to activate it. Then, as if you were using the Bezier tool, click on the image to draw a connect-the-dots pattern around your intended selection. The intelligent scissors tool will try to guess what you're selecting, so the lines it draws between the control points will (hopefully) follow the edge of your selection instead of being just a straight line.
To refine your selection, you can move the control points by clicking on one and dragging. Once you're happy with the selection, click inside it to activate it.
 Move layers and selections
The move tool is used to move a selected region.
Just after you've created an active selection, if you move your mouse cursor over it, you'll see the mouse cursor turn into the move symbol. Click and drag on the selection to move it. This technique works even if the move tool is not activated in the Toolbox.
With the move tool activated, if you click and drag on your image, you'll move the entire image (or the active layer). If you press the Alt key and then click and drag on the image, you'll just move the selection (the marching ants outline).
With the move tool activated, if you press Alt and then use the arrow keys, you can move the currently active selection, one pixel at a time.
 Zoom in & out
Also known as the magnifying glass, the zoom tool is used to enlarge (by clicking) or reduce (by Ctrl-clicking) the image. You can also click and drag to zoom in on a specific region in the image.
Alternatively, the = keyboard shortcut will zoom in and - will zoom out.
 Crop the image
The crop tool, which resembles a scalpel, is used to cut away portions of an image. Click and drag to draw a rectangular selection that you want to keep. The Crop Information dialog will appear. Click on the Crop button on the Crop Information dialog to cut away everything outside the selection. Alternatively, click on the Selection button to make a customizable crop box appear. The control squares at the edge can then be individually moved to refine the crop selection.
 Transform the layer or selection
The transform tool can be used to rotate, scale, shear or change the perspective of an image or selection. Double-click on the Transform button to display the Transform Tool Options dialog. Choose which action you want to perform on the image or selection. Move the mouse cursor over the selection or image and you'll see the mouse cursor change into the transform tool circular arrows icon. Then click and drag on the image image or selection to perform the action that you've chosen.
 Flip the layer or selection
The flip tool is used to flip (or produce a mirror image) of an image or selection.
 Add text to the image
The text tool is used to add text to the image. Select the text tool and then click on the image. The Text Tool dialog will appear. Set the parameters for the text you want to add, type your words into the field at the bottom of the dialog and click on OK to add the text. Please note that the fonts displayed by the GIMP are the fonts that are accessible to X on your system.
When you add text to an image, it is selected. If you move your mouse cursor over the text, you'll see the move icon, and you can click and drag to move the text to an appropriate spot on the image.
 Pick colors from the image
The color picker is used to choose a color from the image. The Color Picker dialog will display the individual RGB values and the hexadecimal for the selected pixel. Additionally, the active color box at the bottom of the Toolbox will change to the value of the chosen pixel.
 Fill with a color or pattern
The bucket or bucket fill tool is used to fill a selection with the active color or with a pattern.
 Fill with a color gradient
The blend or gradient tool is used to fill a selection with a range of colors.
To add a gradient to a selection, first double-click on the gradient button to display the gradient Tool Options. The Blend pull-down menu controls the range of colors you're applying. You can blend from the foreground color to the background color or vice versa, you can blend from a color to transparency, or you can choose from the many custom gradients available in the GIMP.
You can set the "shape" of the gradient with the Gradient pull-down menu on the gradient Tool Options. You can also set whether the gradient repeats or not, using the Repeat pull-down menu.
Once you've chosen a gradient to use, click and drag on your selection, or on the entire image, to apply your gradient. For most gradients (but not all), the length of the drag affects the range of the gradient; a short drag will equate to a compact gradient with more defined edges between colors, while a long drag will produce a wider gradient with less clearly defined edges.
 Draw sharp pencil strokes
The pencil is used to draw lines, curves or shapes with sharp, defined edges. See the section called The Brush Selection Dialog for instructions on selecting brushes for use with the pencil.
 Paint fuzzy brush strokes
The paintbrush is used to draw lines, curves or shapes with soft edges. See the section called The Brush Selection Dialog for instructions on selecting brushes for use with the paintbrush.
 Erase to foreground or transparency
Oddly enough, the eraser is used for erasing. See the section called The Brush Selection Dialog for brushes that can be used with the eraser.
 Airbrush with variable pressure
The airbrush is used to draw in various levels of opacity up to full (which would be like drawing with the paintbrush). See the section called The Brush Selection Dialog for instructions on selecting brushes.
 Paint using patterns or image regions
The clone or stamp tool is used to select portions of the image, which are then used as "paint." The clone tool can be used to remove unwanted portions of an image, by painting over them with patterns from the image itself.
Click on the clone tool in the Toolbox to activate it. Then hold down the Ctrl key and click on the place in the image which will supply the pattern for painting. Release the Ctrl key. Click and drag to apply the selected pattern to the image. A + sign will follow along with the pencil icon of the clone tool. The + sign starts at the spot you picked and indicates where the "paint" is coming from in the image.
 Blur or sharpen
The blur/sharpen tool is used to paint a blurring or sharpening effect on specific portions of an image.
 Draw in ink
The ink pen is used to draw lines similar to those drawn using a pen; the line's thickness depends upon the speed of the drawing device (a pen tablet or your mouse). The pen's Tool Options include settings for the size and shape of the pen.
 Dodge or Burn
The dodge/burn tool is used to adjust intensity values (the amount of white in each pixel) in an image.
The Tool Options for the dodge/burn tool allow you to set whether you want to dodge (increase the intensity) or burn (decrease the intensity). The Exposure slider sets how much you want to change the intensity, from 0 to 100%. The Mode sets which pixels will be affected: Highlights, pixels with high intensity values; Midtones, pixels with medium intensity values; or Shadows, pixels with low intensity values. The dodge/burn tool is used with a particular brush; see the section called The Brush Selection Dialog for more information about brushes.
 Smudge
The smudge tool is used to blur or smear an image with the currently selected brush. See the section called The Brush Selection Dialog for more information on brushes.
 Measure distances and angles
The measure tool can be used to measure a distance on an image, or to measure an angle from the horizontal.
Colors
At the bottom of the Toolbox, you'll see the active colors display:
The active color square is depressed; you can see in Figure 9-2 that the black foreground color square is the active color.
By default, black is the active foreground color and white is the
active background color. To "flip" the foreground and background
colors, click on the  .
.
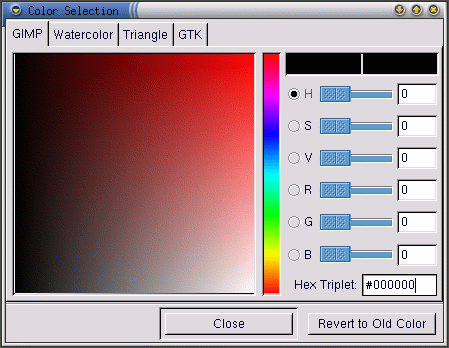
Click on the active color box to display the Color Selection dialog:
You can select a color "freehand," by choosing one of the radio buttons for hue, saturation, value, red, green or blue, picking a range of color from the middle bar, and then picking a specific color from the color square.
You can also just type in the correct RGB values or the hexadecimal value for the color you want to select.
As you choose colors by clicking on the color square, or by typing in exact values, you'll see the active color box on the Toolbox change to the new color.
Color selection is a lot more complicated than what is covered here. If you're interested, you should check out some of the more in-depth resources in the section called Where to Find More Information.
The Active Brush, Pattern and Gradient
A square on the bottom right of the Toolbox displays the active brush, pattern and gradient:
If you want to choose a different brush, pattern or gradient, double-click on either the active brush, pattern or gradient to display the palette of choices for each. Click on a choice from the palette to make it the active brush, pattern or gradient.
Selecting Areas in an Image
The GIMP provides six selection tools. You can use these selection tools by clicking and dragging on the portion of the image you want to select. The GIMP also provides ways to modify your selection.
These modifications will only work while your selection is active. You can recognize an active selection by the moving dotted line around its perimeter (marching ants).
When the mouse cursor is on your selection, the cursor becomes the move symbol. If you click and drag on the selection, you can move the selection.
The Shift key allows you to add to the selection. Once you have an active selection, if you hold down the Shift key and then use a selection tool to select a portion of the image, the new selection will be added to the active selection.
The Ctrl key allows you to subtract from an active selection. If you hold down the Ctrl key and then use a selection tool to select a portion of an active selection, that portion will be removed.
The Brush Selection Dialog
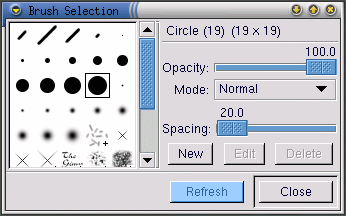
To display the Brush Selection dialog, click on the active brush on the Toolbox. The Brush Selection dialog looks like Figure 9-5:
When you use GIMP drawing tools, you can modify the attributes of the line you're drawing by selecting a particular brush.
Click on a brush in the palette to select it. If the brush is larger than the square can display, click and hold to see the entire brush.
Loading a File
Before you can do any image manipulation, you need to somehow acquire an image. For example, you can scan an image, you can find one on the Internet (be careful about copyright restrictions!), or you can take a picture with a digital camera.
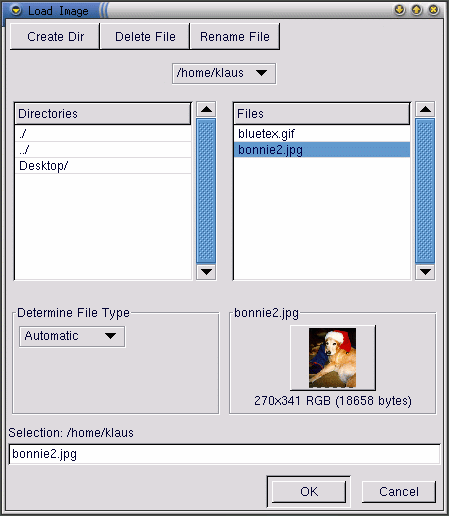
To load an existing file, click on File => Open. You'll see the Load Image dialog, as shown in Figure 9-6.
The Load Image dialog displays your working directory when you started GIMP. You can navigate up and down the filesystem tree by double-clicking on the Directories list on the left, then select a file to open from the Files list on the right.
Filename completion is supported by the GIMP. If you type the first letter (or more) of a filename into the Selection field and press the Tab key, the view will change to only those subdirectories and/or files beginning with that letter or letters.
The file you select will appear in the Selection field near the bottom of the dialog. A thumbnail preview will be dispalayed on the dialog; alternatively, you'll see a Generate Preview button. If you want to see a thumbnail of the image, click on the Generate Preview button.
Once you've selected a file, click on the OK button to open it. You can also double-click on a filename to open the file.
Saving a File
To save an image file, right click on the image and choose File => Save (or Save as). You'll see the Save Image dialog if you choose Save as or if you choose Save but the file has not been saved before.
The Save Image dialog looks almost exactly like the Load Image dialog and navigation of the filesystem tree and choosing files works in the same way.
When you're saving an image, you'll need to choose what format to save it in. The GIMP supports a wide variety of image formats. In this chapter, we're going to talk about three of them: .gif, .jpg and .xcf.
Image Formats
The vast majority of images on the Web are in one of two formats: .gif or .jpg. Both formats utilize compression to provide smaller file sizes and shorter download times (download speed is of paramount importance for everything on the Web). In most other ways, however, these two image formats are very different, and they're best used for different purposes.
The .jpg format is best used for photographs or images which use a lot of different colors.
The .gif format is best used for images which only use a few colors or which incorporate relatively large areas of the same color.
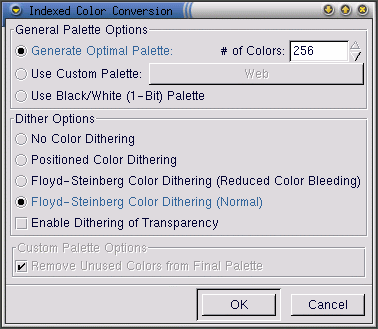
Before the GIMP will allow you to save an image as a .gif, you'll need to convert to indexed color or to grayscale. Convert an image to indexed color by right-clicking on the image and then selecting Image => Mode => Indexed. The Indexed Color Conversion dialog will be displayed:
To minimize file size, a .gif image can only display a maximum of 256 colors. When you convert to indexed color, the RGB colors in the image are "standardized" to a particular palette of colors. If your image is going to be used on the Web, the safest palette choice is Use Custom Palette: Web. The palette optimized for the Web includes the group of 216 colors that are used by the majority of Web browsers.
After you've converted your image to indexed format, the GIMP will allow you to save it as a .gif file.
If you're working on an image in the GIMP, and you want to save it in order to keep working on it later, you should save it as a .xcf file. The .xcf format is the GIMP's native file format. If you create an image in the GIMP, or if you open an image and add GIMP effects (such as layers or masks) to it, you have added information to the image file. This information will be lost if you save the image as a .gif or .jpg. If you save a file as a .xcf file, you'll preserve that information. When you re-open the .xcf file, you'll be able to edit the file as if you had never closed it.
The Image Window
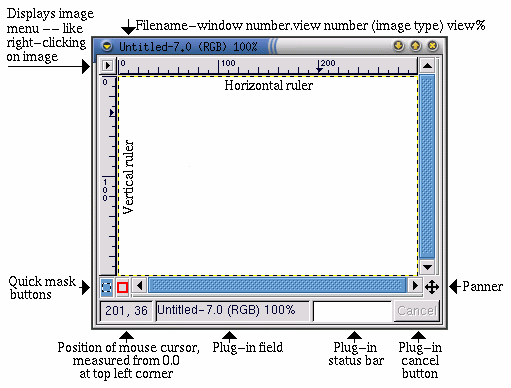
When you load an image or open a new image, the GIMP surrounds the image with a frame which includes helpful information and tools, as shown in Figure 9-8.
At the top, the image window displays a file identifer consisting of:
the name of the file (preceded by an * if the file has been modified)
the window number (sequential from 0 for the first image opened when you start the GIMP)
the view number (sequential from 0 for each image view)
the image type -- RGB, Indexed, or Grayscale
the amount of the image that can be seen in the window, depending on if you've zoomed in on the image
At the top left, if you click on the  icon, the image
menu will appear.
To help you visualize the size of your image, the GIMP provides horizontal and vertical rulers. You can toggle these off and on by right-clicking on the image and selecting View => Toggle Rulers.
At the bottom left, you'll see the position of the mouse cursor on the image, measured from 0,0 at the top left corner.
Just above the mouse cursor position window, you'll see two square icons, which are used for creating quick masks. Basically, masks are selections which can be saved and used again. We won't cover masks in this elementary chapter, but if you use the GIMP for complex images, you'll find masks to be very helpful. Please see some of the sources listed in the section called Where to Find More Information for more information on masks.
Near the bottom right, you'll see an icon that looks like the move tool icon. This is called the panner. If you're zoomed in on an image, you can click on the panner to display a thumbnail of the whole image. Then you can click and drag on the thumbnail to pan the image view in your image window.
Along the bottom of the window, next to the mouse cursor position window, you'll see two status fields and then a Cancel button. The first status field displays the file name, unless a plug-in is running (for example, if you're applying a filter or a Script-Fu to an image). If a plug-in is running, the name of the plug-in will appear in the first status window. The next field is empty, but will display a status bar for a running plug-in. Finally, the Cancel button allows you to stop a running plug-in.
Helpful Keyboard Shortcuts
Like many other applications, the GIMP makes it easy to accomplish tasks without taking your hands off the keyboard. Here are a selection of helpful keyboard shortcut commands:
